


تركيب لوحة العدادات الرقمية لشيفروليه سيلفرادو 2014–2018: 11 خطوات حقيقية + فحوصات نهائية
يشرح دليل تركيب العدادات الرقمية لشيفروليه سيلفرادو هذا تسلسل التركيب الفعلي لعدادات iKAGOO الرقمية بقياس 12.3 بوصة المستخدمة في تكوينات شيفروليه سيلفرادو وGMC سييرا المدعومة من 2014–2018.
إنه مكتوب بحيث يستطيع القارئ لأول مرة فهم ليس فقط ما يجب إزالته, بل أيضًا سبب إزالة كل جزء, ومتى يمكن فصل العدادات الأصلية بأمان، ومتى يجب اختبار العدادات البديلة، وما يجب فحصه قبل إغلاق لوحة القيادة مرة أخرى.
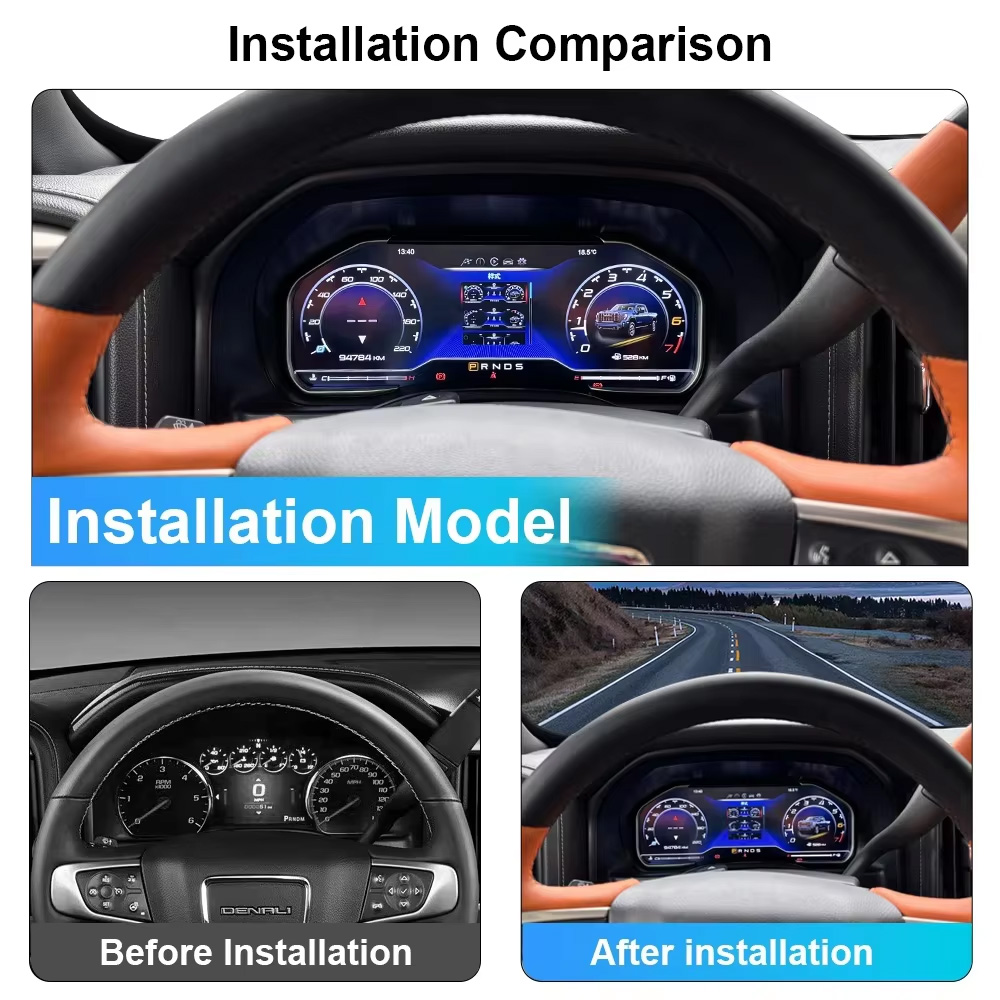
قد تستخدم العدادات البديلة المشابهة بصريًا أجهزة وبرامج ثابتة وبروتوكولات مركبة وتكوين CAN ومعايير هندسية مختلفة. لا تفترض أن العدادات المشتراة من بائع آخر يمكنها استخدام نفس البرامج الثابتة أو قيم المعايير أو تعليمات الدعم الفني. تكوين iKAGOO الخاص بالإصدار وإرشادات ما بعد البيع مرتبطة بطلب iKAGOO الأصلي.
كيف يعمل تركيب العدادات الرقمية لشيفروليه سيلفرادو؟
لا تفكر في هذه المهمة على أنها مجرد “إزالة العدادات القديمة وإدخال العدادات الجديدة.” تتداخل عدة قطع من لوحة القيادة مع بعضها البعض. يجب تحرير الألواح المحيطة أولاً حتى يمكن إحضار العدادات المصنعية إلى الأمام دون إجهاد لوحة القيادة.
توافق تركيب العدادات الرقمية لشيفروليه سيلفرادو: ما السنوات التي يغطيها هذا الدليل؟
يغطي مسار التركيب الفعلي الموثق في هذه المقالة تكوينات لوحة القيادة المدعومة لشيفروليه سيلفرادو وGMC سييرا من 2014 حتى 2018.
هل تركب لأول مرة؟ افهم هذه الأجزاء قبل أن تبدأ
قبل البدء في تركيب الشاشة الرقمية لشيفروليه سيلفرادو
قارن لوحة القيادة لديك مع صور التركيب قبل إزالة أي شيء. يجب أن تتوافق منطقة عجلة القيادة ومجموعة العدادات الأصلية وتخطيط أدوات التحكم المركزية مع التكوين الموثق.
تركيب الشاشة الرقمية لشيفروليه سيلفرادو: إجراء مفصل من 11 خطوة
اتبع التسلسل بالترتيب. لا تنتقل مباشرة إلى مجموعة العدادات الأصلية. يجب تحرير الإطار ونقاط التثبيت حولها أولًا.
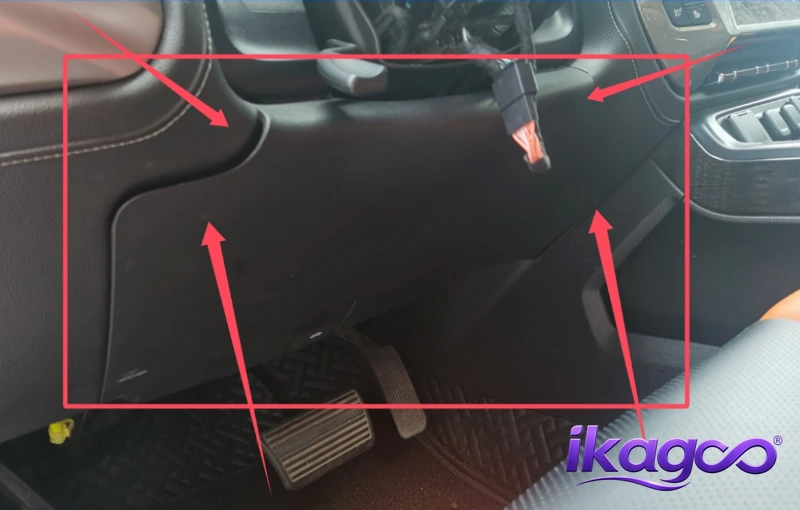
فك الدرع السفلي أسفل عجلة القيادة
ابدأ أسفل عجلة القيادة وفك الدرع السفلي. يوفر ذلك الخلوص اللازم لتحرك إطار لوحة القيادة المحيط أثناء المرحلة التالية.
يتداخل إطار محيط العدادات مع قطع لوحة القيادة المجاورة. تحرير المنطقة السفلية أولًا يقلل من احتمال إجبار الإطار العلوي.
اعمل تدريجيًا حول الحافة. إذا بقي نقطة واحدة ثابتة، افحص ذلك الموضع بدلًا من سحب اللوحة بأكملها بقوة أكبر.
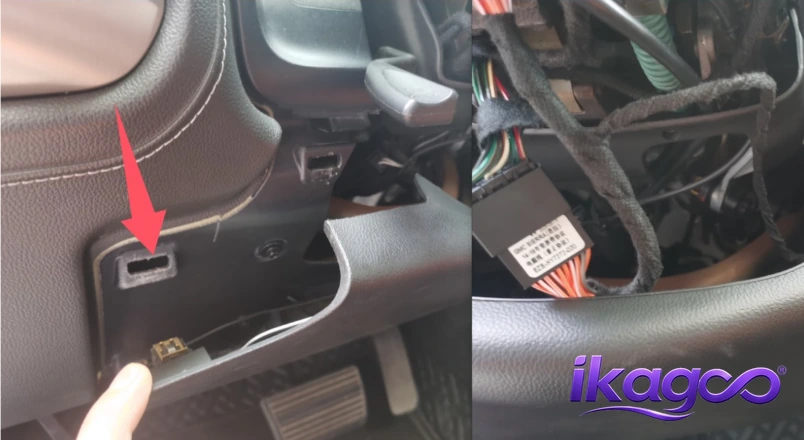
Release the Cover Above the Instrument Cluster
Remove the upper dashboard cover to expose the next set of instrument-area fixing points.
Release the panel gradually across its width rather than lifting one corner aggressively while the opposite side remains clipped.
If the plastic bends but does not release, another retaining point may still be engaged.
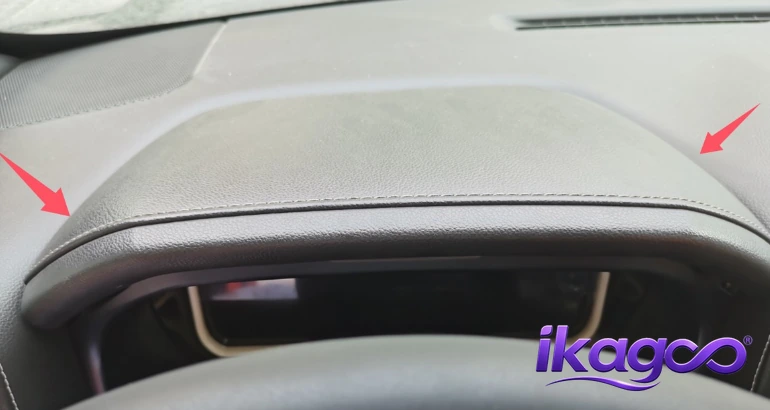
Remove the Instrument-Surround Fixing Screws
Remove the screws exposed after the upper trim has been released. These mechanically secure the driver-side instrument area.
Keep these fasteners together so they return to the correct mounting points during reassembly.
Do not start pulling the cluster surround while visible screws are still installed.
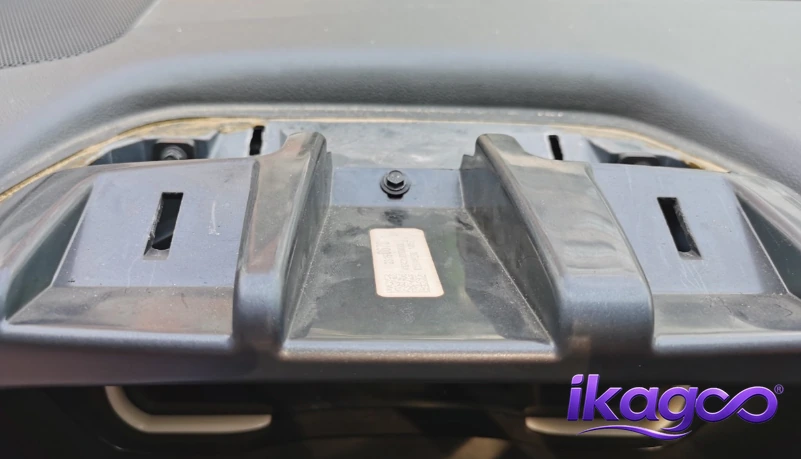
Remove the Center-Control Cover
The neighboring center-control trim overlaps the dashboard structure around the instrument area and needs to be released.
You are not replacing the center controls. Their surrounding trim needs to move so the instrument area can be released without forcing two overlapping panels against one another.
Work around the edge progressively and support the panel as clips begin to release.
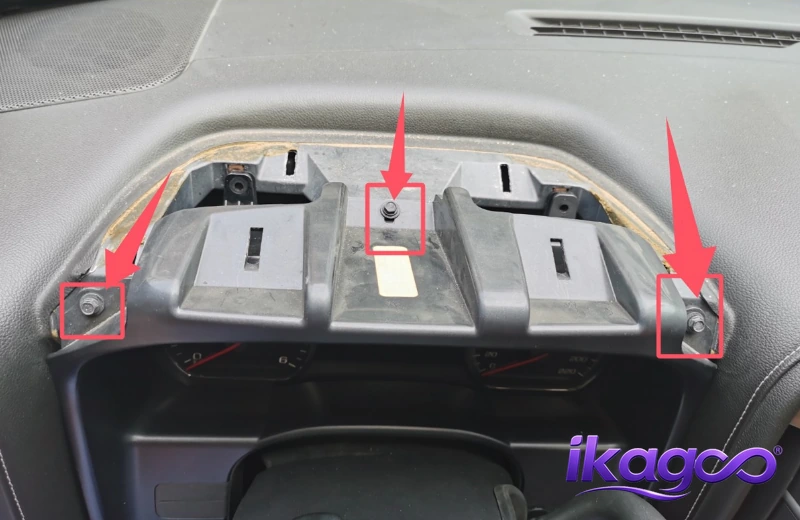
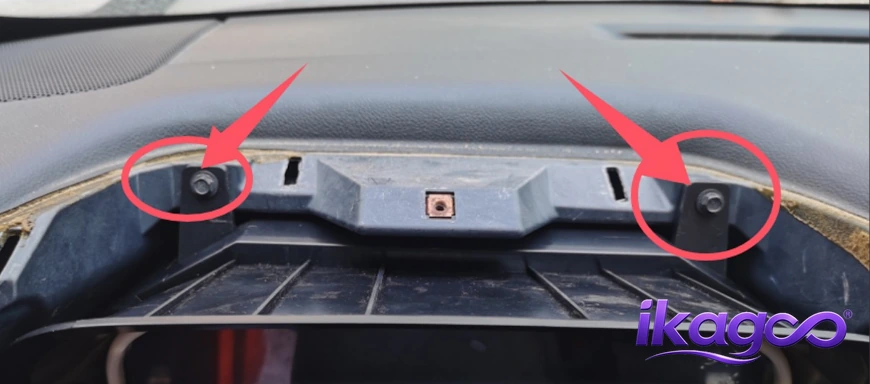
Remove the Remaining Dashboard Fixing Screws
Additional screws are now accessible after the surrounding trim has been removed.
Some fasteners are hidden behind the dashboard trim and only become visible after earlier panels are released.
If the dashboard still feels firmly bolted in place, recheck the exposed mounting points before pulling harder.
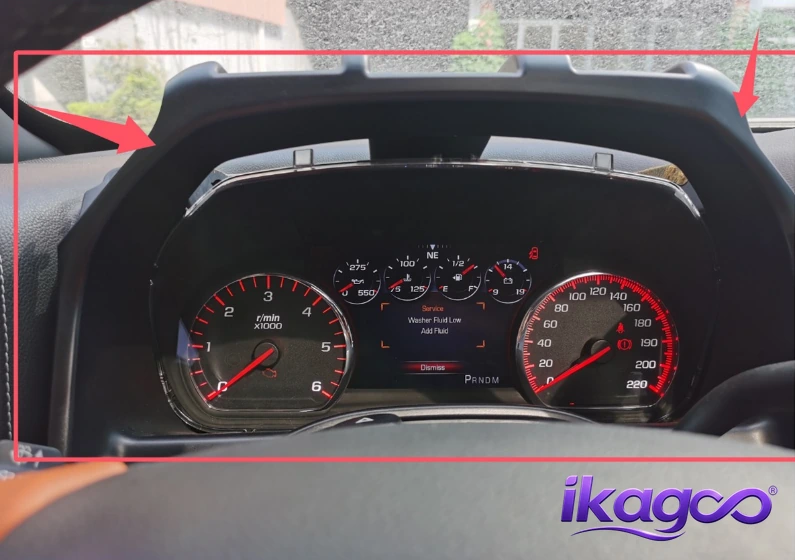
Bring the Original Cluster Forward and Disconnect the Factory Plug
Carefully bring the factory cluster forward only far enough to access the rear electrical connection.
The electrical harness is still connected at this point. Give yourself enough access to reach the connector without putting tension on the wiring.
Release the connector lock and pull the connector body itself. Do not pull the wiring harness to remove the plug.
Connect the iKAGOO 12.3-Inch Digital Instrument Cluster
Align the matched vehicle connector with the replacement iKAGOO digital cluster and seat the connection fully.
Confirm the plug shape, orientation and locking position before seating it. The correct matched connector should align naturally.
If the connector or housing does not correspond naturally, stop and verify the supplied product version.
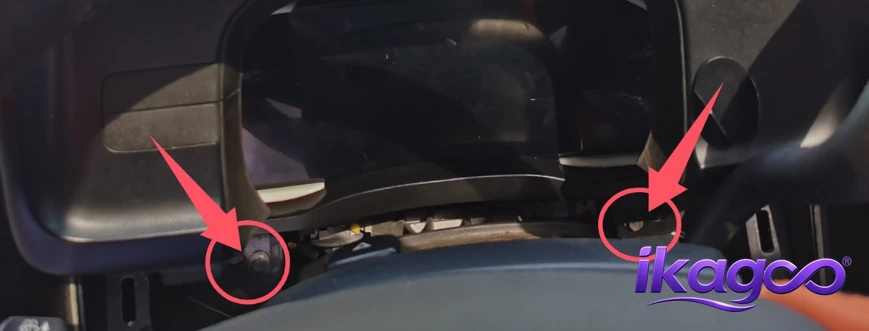
Power On the Vehicle and Test the Cluster Before Reassembly
This is the most important checkpoint in the Chevrolet Silverado Digital Cluster Installation.
Power the vehicle and confirm that the cluster wakes up and displays normally.
Check supported speed, RPM, fuel level, temperature, gear-position and important warning information relevant to the supplied configuration.
If something is wrong, the connector and cluster are still accessible. Closing all trim before testing only creates unnecessary repeat work.
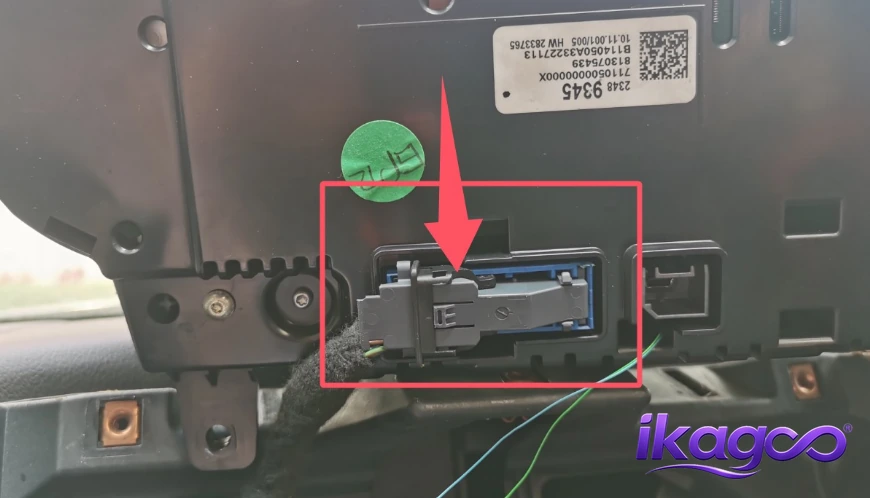
Position the Cluster and Reinstall the Fixing Screws
Once the first function test passes, move the replacement cluster into its final mounting position.
The cluster should sit naturally in the original opening. Do not use the screws to pull a badly aligned housing into place.
Once secured, the cluster should not move inside the factory mounting area.
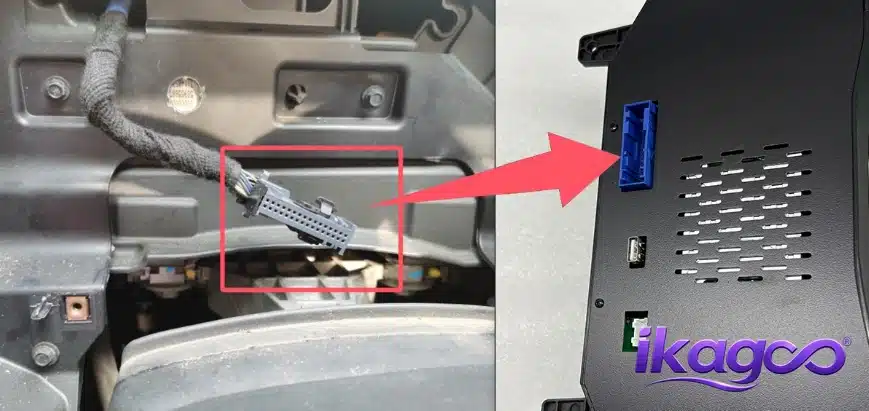
Reinstall the Original Center-Control Panel
Start restoring the factory dashboard in the reverse order of removal.
The original control panel should return to its factory location without bending or excessive pressure.
Uneven gaps usually indicate that a panel or clip is not seated correctly.
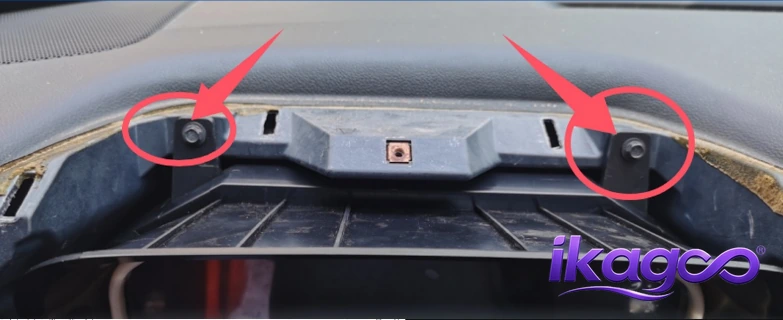
Restore the Upper and Lower Dashboard Covers
Complete the physical installation by reinstalling the dashboard covers removed at the beginning.
Position the panel correctly first and then engage the clips gradually.
Look around the cluster, steering-column area and center controls. No trim should bow outward or leave an unusual gap.
What Should You Test After the Chevrolet Silverado Digital Cluster Installation?
A powered display alone does not prove that the installation is complete. Confirm the essential vehicle information before treating the job as finished.
Chevrolet Silverado Digital Cluster Installation Troubleshooting: When Should You Stop?
Do not keep reassembling the dashboard if one of the following basic problems appears.
Stop. Verify product version and vehicle compatibility instead of forcing or modifying the connector.
Keep the dashboard open and recheck the rear connection and supplied product configuration.
Do not force it closed with screws. Check the cluster position, panel edges and retaining clips.
Chevrolet Silverado Digital Cluster Installation: Final Fitment, Reassembly and Display Check
Do not evaluate the installation only by asking whether the screen turns on. A correct installation should leave the cluster naturally positioned inside the factory opening, with the surrounding trim aligned and the core driver information behaving normally.
The four images below represent different parts of the final inspection. The first images help you check physical fit and trim alignment; the final image shows the completed driver-facing appearance.
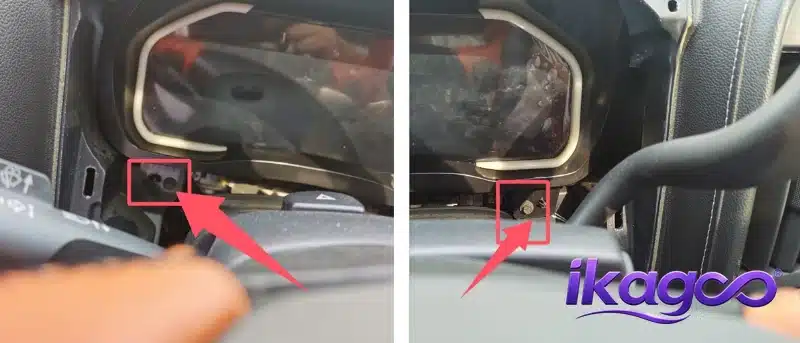
Check the cluster mounting area and make sure the replacement hardware is sitting naturally without forcing the housing or wiring.
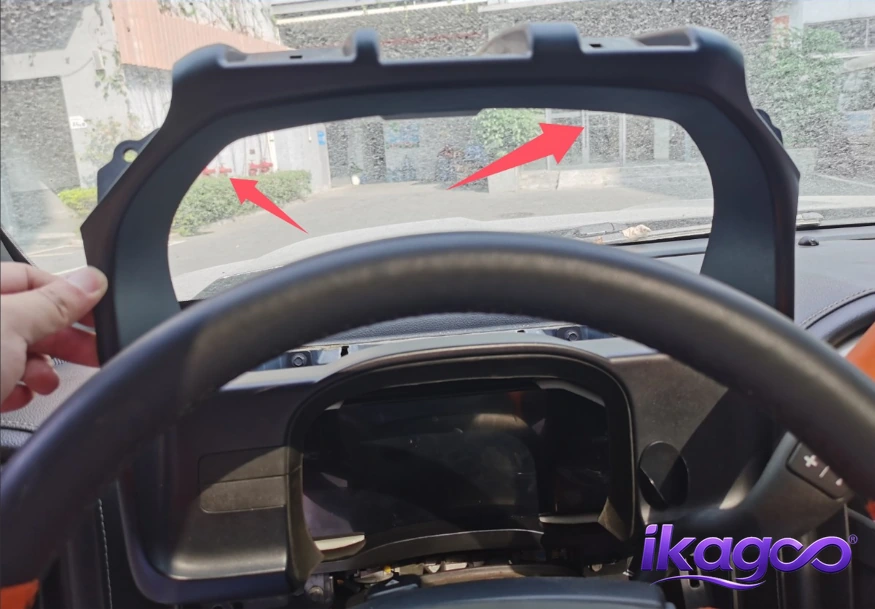
Verify that the installed cluster position corresponds to the original dashboard opening before the trim is fully locked in place.
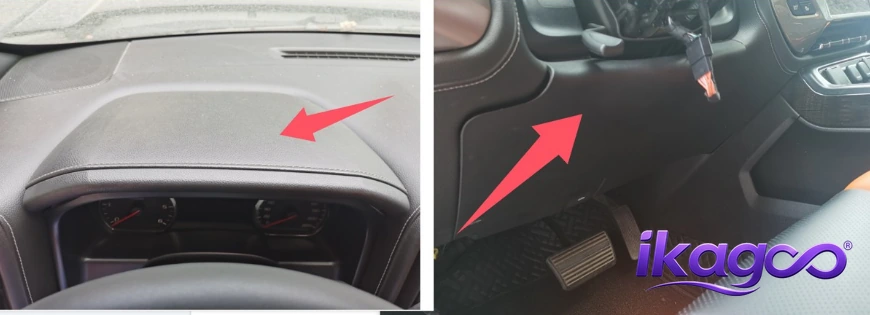
Inspect the surrounding upper and lower trim. Uneven gaps usually indicate that something has not seated correctly.
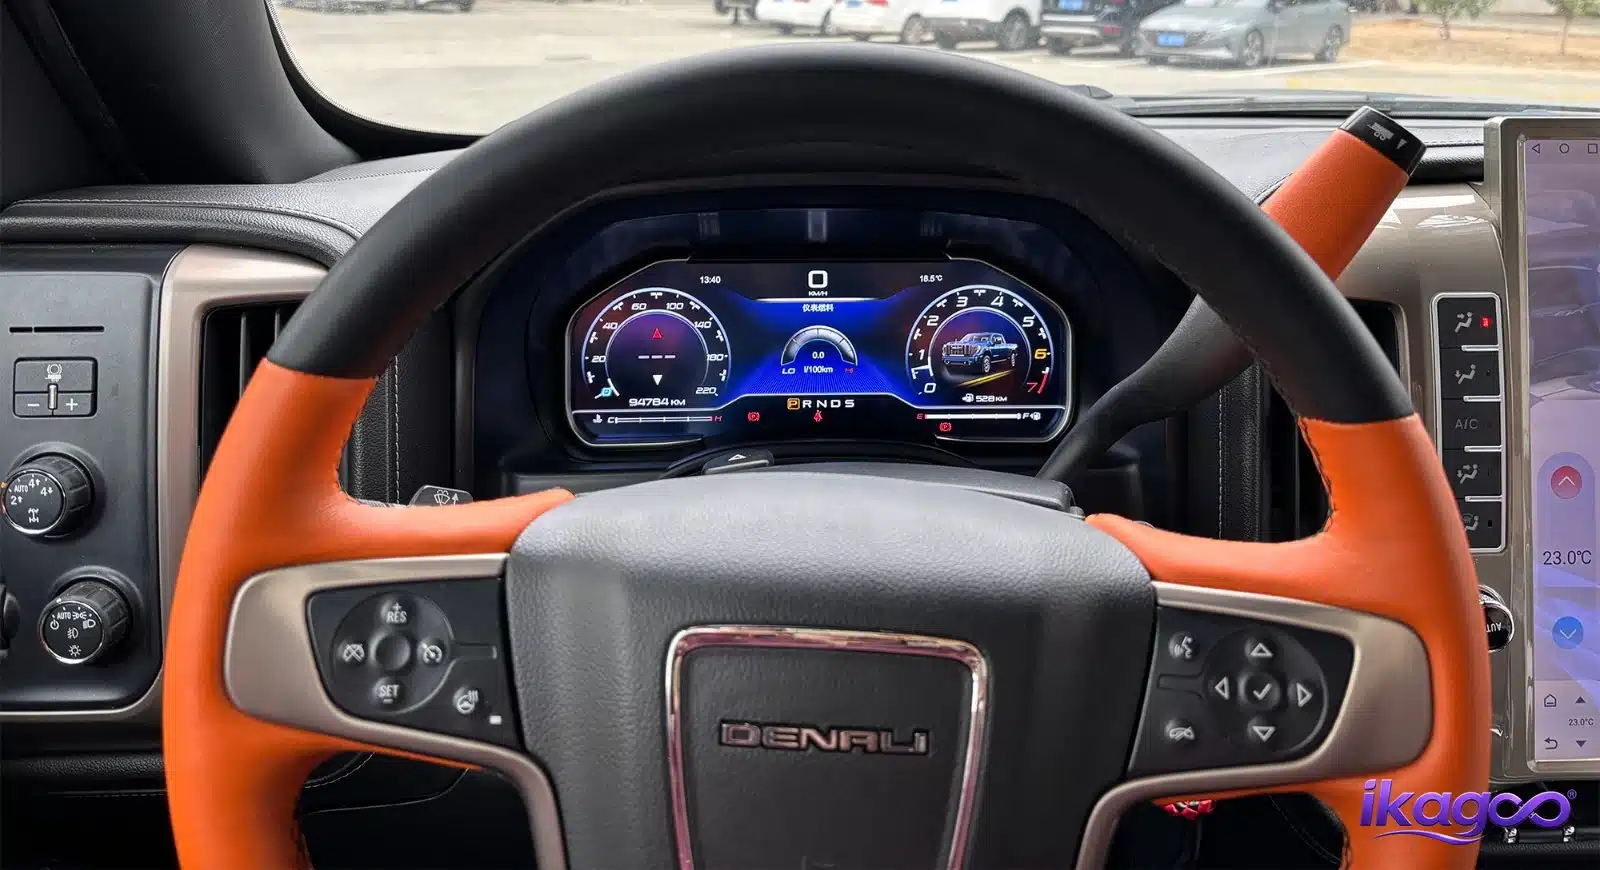
Final driver-facing appearance after the digital cluster and dashboard trim have been restored.
Chevrolet Silverado Digital Cluster Installation: iKAGOO Product and Technical-Support Boundary
Two aftermarket clusters can look nearly identical from the front while using different internal boards, CAN modules, firmware, vehicle protocols and engineering parameters.
For that reason, iKAGOO-specific firmware, CAN settings, engineering values and version-specific troubleshooting should not be copied to unidentified third-party hardware.
Chevrolet Silverado Digital Cluster Installation: Initial Settings After Installation
After the hardware passes the first vehicle-data test, complete the basic user settings. Menu wording can vary slightly by software version, so use the equivalent option shown on your delivered unit.
Confirm Core Vehicle Data Before Changing Appearance Settings
First verify that the cluster is already receiving the important vehicle information correctly.
Set Speed and Distance Units
Select the measurement system appropriate for the country where the vehicle is used.
Metric markets: km/h / kilometers
After changing the unit, return to the main instrument screen and verify that the displayed unit has changed correctly.
Select the Display Language
Choose the language that is easiest for the driver to understand.
Language availability can vary with software version.
Check Brightness and Day / Night Visibility
Choose a brightness level that keeps the main driving information readable without distracting the driver.
Night-time brightness / supported day-night behavior
Set Up Wireless Apple CarPlay
Wireless Apple CarPlay is supported on the current iKAGOO 12.3-inch Chevrolet / GMC product route.
After pairing, confirm that the supported CarPlay interface, navigation and compatible phone/media functions display normally.
Do Not Copy CAN or Engineering Parameters From Another Cluster
Vehicle profile, CAN protocol, calibration values, engineering settings and firmware can depend on the exact hardware and software version delivered with the order.
If an exact iKAGOO parameter is required, use the original order number so support can identify the applicable product version.
Need Exact Chevrolet Silverado Digital Cluster Parameters or Setup Support?
Exact configuration instructions can depend on the hardware batch, vehicle configuration, CAN protocol and software version supplied with the original order.
iKAGOO customers should provide the original iKAGOO order number. This allows the support route to be matched to the supplied product and vehicle history instead of guessing from a visually similar cluster.
✓ Chevrolet / GMC model
✓ Production year
✓ Photo of the installed cluster
✓ Photo of the settings / version screen
✓ Short video if a specific function behaves incorrectly
Exact CAN parameters, vehicle profiles, engineering values, firmware packages, calibration instructions and version-specific troubleshooting should be confirmed against the actual iKAGOO order.
A valid iKAGOO order number is the reference used to identify the supplied hardware and applicable support route. iKAGOO does not recommend applying iKAGOO-specific firmware or engineering parameters to unidentified third-party hardware.
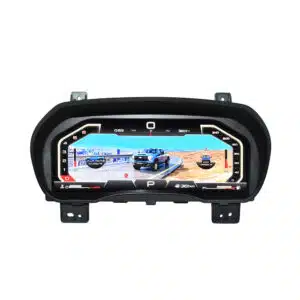
Chevrolet Silverado / GMC Sierra 12.3″ Digital Instrument Cluster
The iKAGOO Chevrolet Silverado / GMC Sierra digital instrument cluster replaces the original gauge area with a vehicle-specific 12.3-inch digital cockpit.
The installation guide above documents the 2014–2018 Silverado / Sierra physical installation route. Final matching still depends on the vehicle and original instrument configuration supplied with the order.
Keep the order number after purchase. It is used as the reference for version-specific setup guidance, applicable parameter confirmation, firmware support and after-sales troubleshooting.
This article does not certify or provide engineering-setting support for visually similar clusters purchased from unrelated sellers.
Chevrolet Silverado Digital Cluster Installation FAQ
ما السنوات التي يغطيها دليل تركيب شاشة العدادات الرقمية لشيفروليه سيلفرادو؟
هل هذا الدليل مخصص لأي لوحة عدادات رقمية شيفروليه سيلفرادو؟
هل يمكنني استخدام برنامج iKAGOO الثابت أو إعدادات CAN على عنقود تم شراؤه من بائع آخر؟
Why do I need to remove center-control trim if I am only changing the instrument cluster?
When should I test the new digital cluster?
ما الذي يجب أن أختبره قبل إغلاق لوحة القيادة؟
ما الوحدات التي يجب أن أستخدمها على شيفروليه سيلفرادو أمريكية؟
Can I install the Chevrolet Silverado digital cluster myself?
Can I use this guide for a 2019 Chevrolet Silverado?
Does the current iKAGOO Silverado digital cluster support Wireless CarPlay?
كيف أحصل على إعدادات المعلمات الدقيقة لمجموعة العدادات الرقمية iKAGOO الخاصة بي؟
Why does iKAGOO ask for an order number before version-specific technical support?
Chevrolet Silverado Digital Cluster Installation & iKAGOO Support Resources
Documented installation range: 2014–2018.
نوع المنتج: iKAGOO 12.3-inch vehicle-specific digital instrument cluster.
Installation evidence: 11 documented physical installation stages plus 4 final fitment / completed-installation reference images.
Technical-support boundary: Public instructions cover physical installation and basic user settings. Version-specific CAN configuration, engineering parameters, firmware, calibration and advanced troubleshooting should be matched against the original iKAGOO order.
Support reference: Keep the original iKAGOO order number for applicable product-version identification and after-sales support.
آخر مراجعة: سبتمبر 2026.





Add comment
يجب أنت تكون مسجل الدخول لتضيف تعليقاً.